Ops Execution supports all new browser versions within 7 days of release and maintains support for the last 2 releases of each browser. ⛔️ Internet Explorer is NOT supported.
Overview
Add a temporary closure in Ops Execution so the tasks scheduled for days a location is closed are deleted for you and don’t negatively impact task completion rates. This guide is for restaurant admins, primarily at enterprise brands, who manage tasks across many locations.
A closure is a set of dates, and the locations it impacts when you do not want tasks to appear. When a location closes for a holiday, bad weather, or repairs, its tasks no longer appear and go undone. Instead, a closure deletes the tasks that fall inside the closed dates.
1
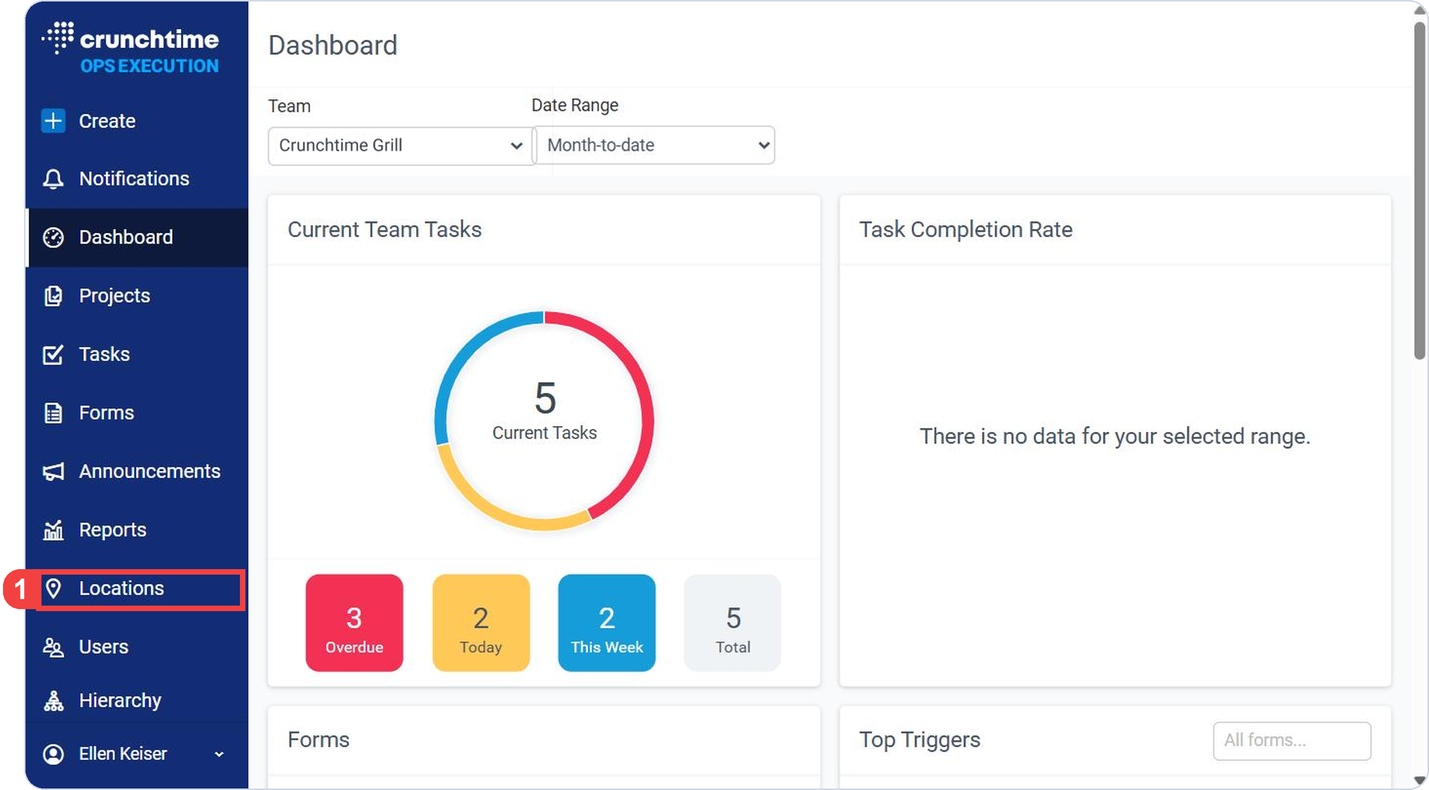
In the nav bar, select Locations.
1
In the nav bar, select Locations.
Note
You need to be an admin or owner to add closures.
Open the Temporary Closures Page
Go to Temporary Closures
The Closures item sits under Locations, under Attributes.
Ops Execution > Locations > Closures
1
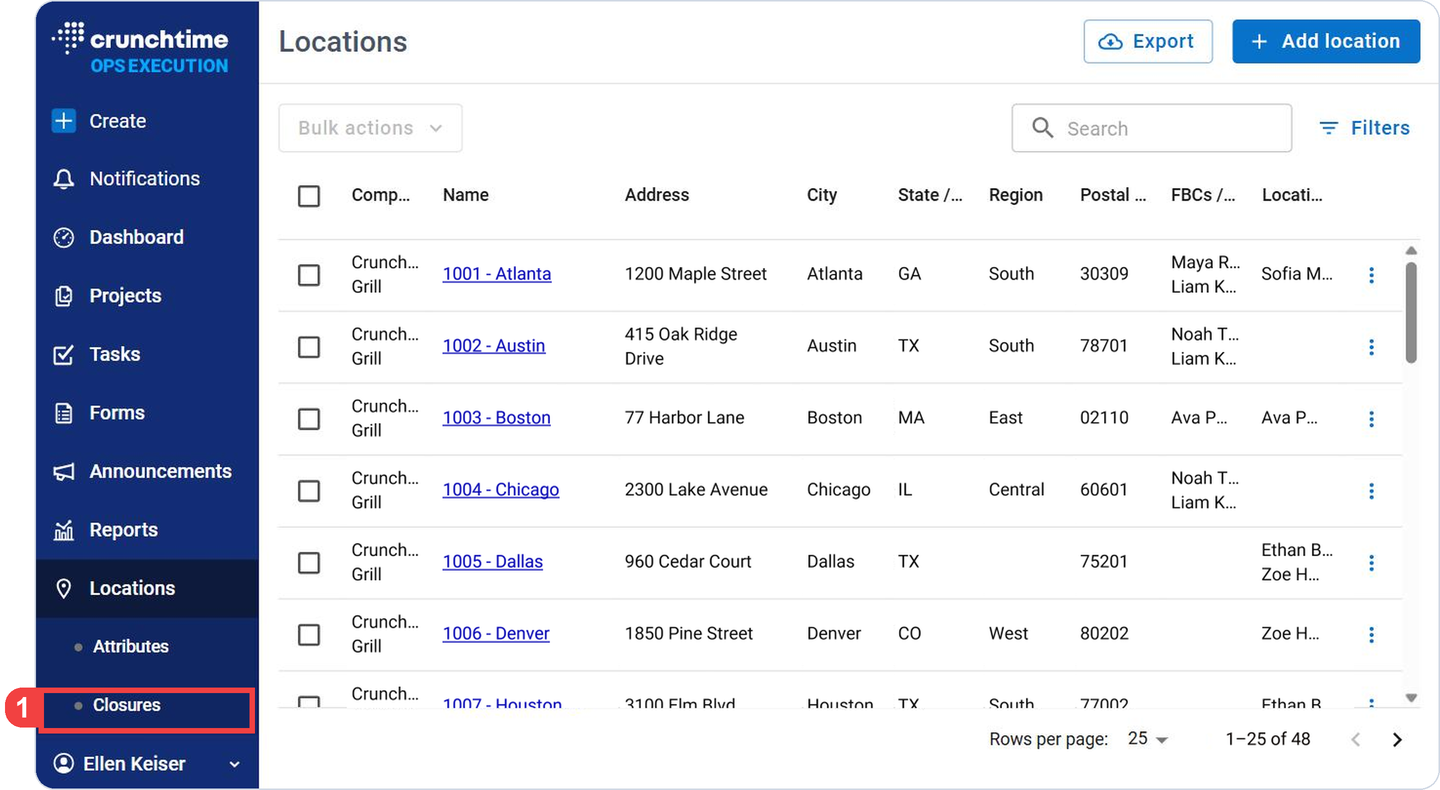
Under Locations, select Closures.
1
Under Locations, select Closures.
Read the Temporary Closures List
See Your Closures and Their Status
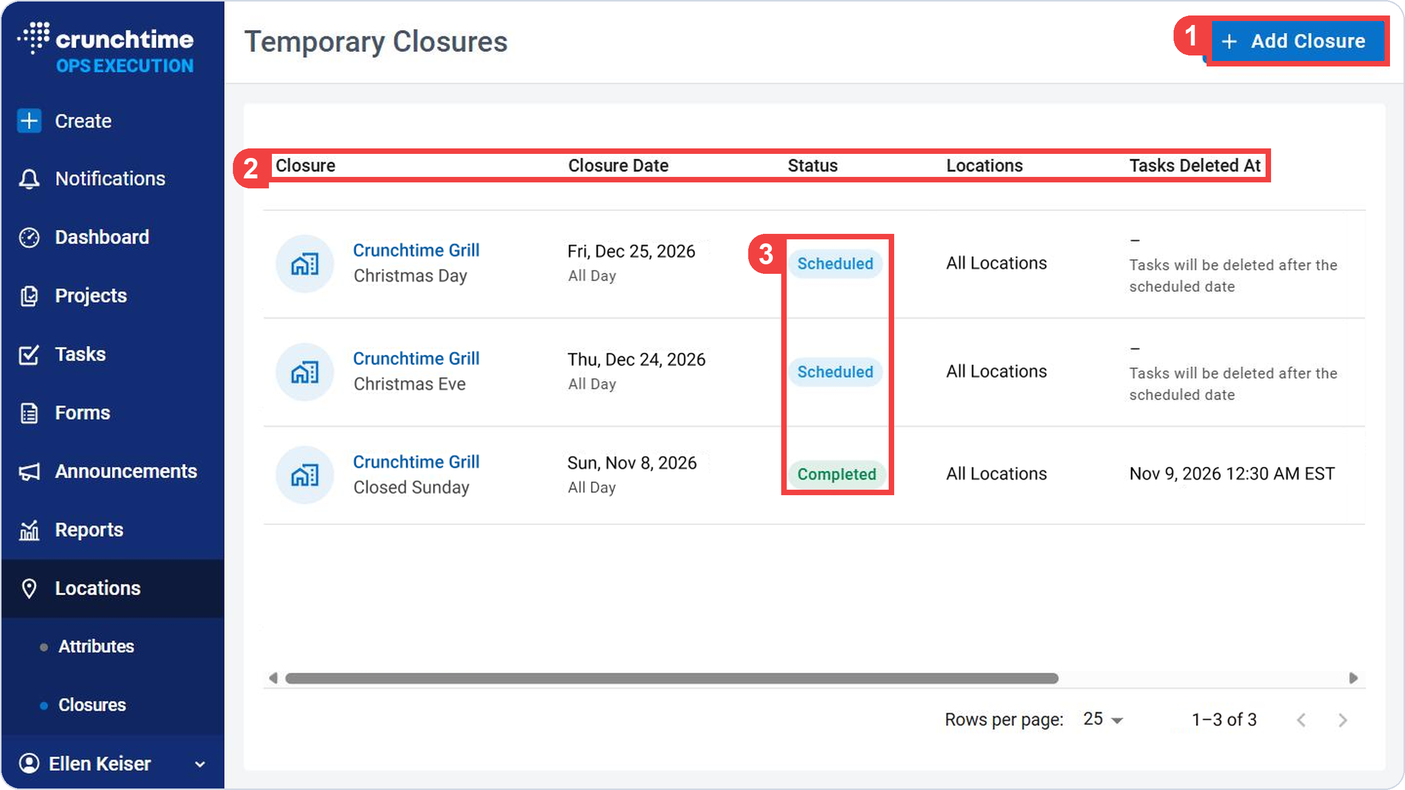
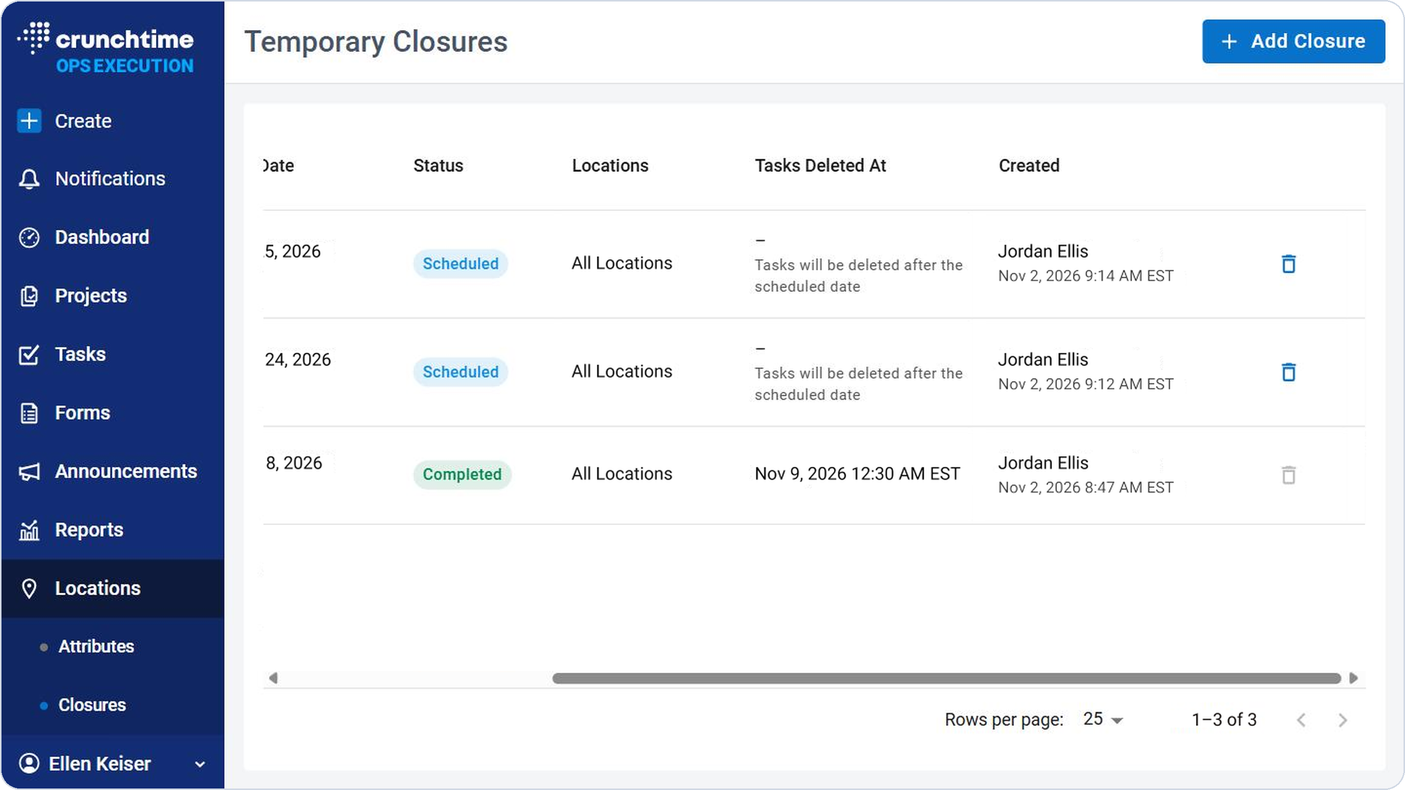
The page is titled Temporary Closures and shows every closure and its status.
Ops Execution > Locations > Closures
1
Use Add Closure to create a new closure.
2
In the Temporary Closures list, check the columns Closure, Closure Date, Status, Locations, Tasks Deleted At and Created.
3
In the Status column, check whether each closure is Scheduled, In Progress or Completed.
1
Use Add Closure to create a new closure.
2
In the Temporary Closures list, check the columns Closure, Closure Date, Status, Locations, Tasks Deleted At and Created.
3
In the Status column, check whether each closure is Scheduled, In Progress or Completed.
Alert
Tasks that a closure deletes cannot be restored. You can cancel this closure before that date.
What the List Shows
Column
What it shows
Closure
The reason you gave for the closure. The Reason field is limited to 255 characters and is required.
Closure Date
The date or dates of the closure.
Status
Where the closure is in the process.
Locations
The locations the closure impacts.
Tasks Deleted At
For a Scheduled closure: “Tasks will be deleted after the scheduled date.”
Created
When and by whom the closure was created.
Status
What it means
Scheduled
The closure is saved. No tasks have been deleted yet, and you can still cancel it.
In Progress
The system has started deleting tasks. You can no longer cancel it.
Completed
The system has finished deleting tasks.
Add a Closure
Start a New Closure
Tell Ops Execution why the location is closed and when.
Ops Execution > Locations > Closures
2
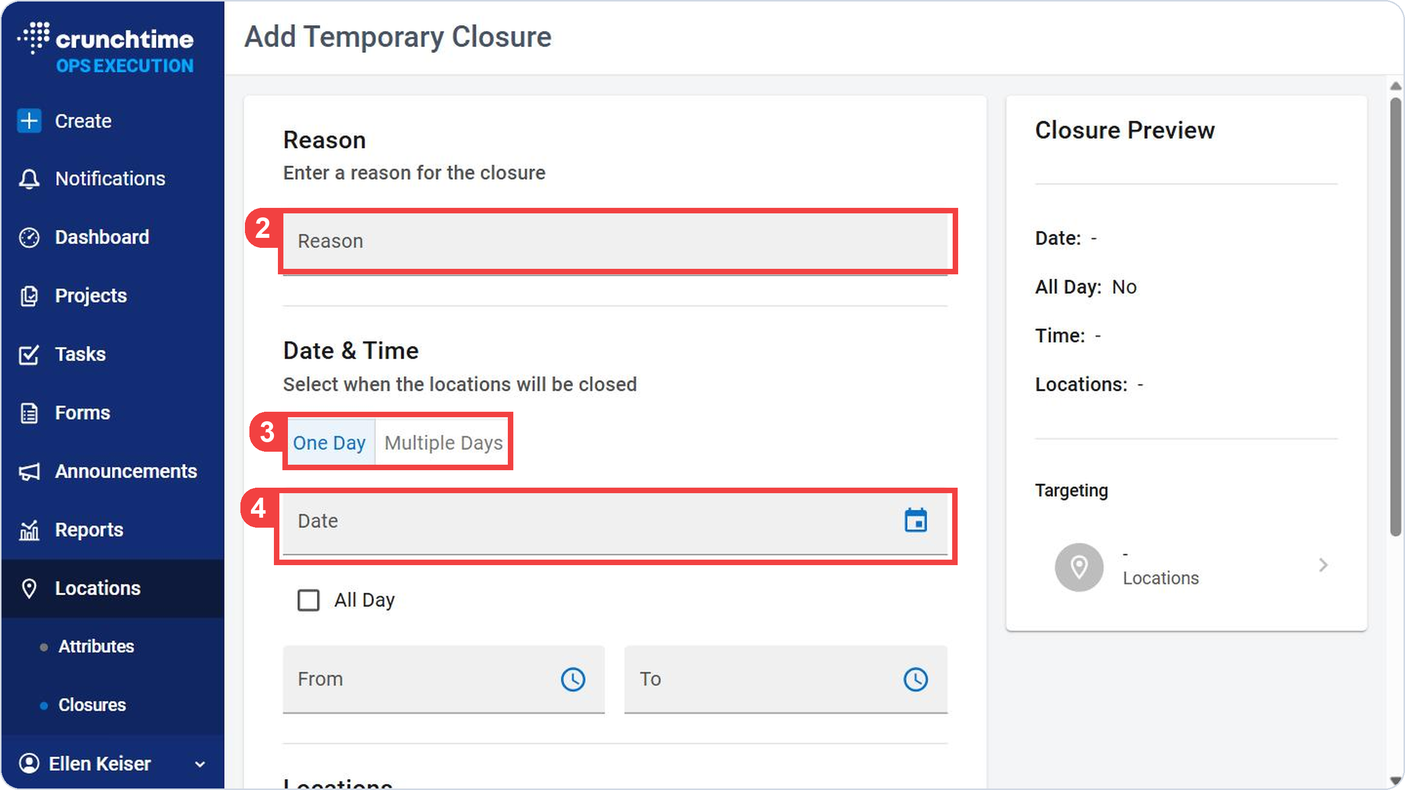
In Reason, type why the locations are closed.
3
Choose One Day or Multiple Days.
4
Select the Date.
• For Multiple Days, choose the first and last date.
1
Select Add Closure.
The Add Temporary Closure form opens.
2
In Reason, type why the locations are closed.
3
Choose One Day or Multiple Days.
4
Select the Date.
For Multiple Days, choose the first and last date.
Set the Time and the Locations
Choose how much of the day is closed and which locations the closure impacts.
Ops Execution > Locations > Closures
5
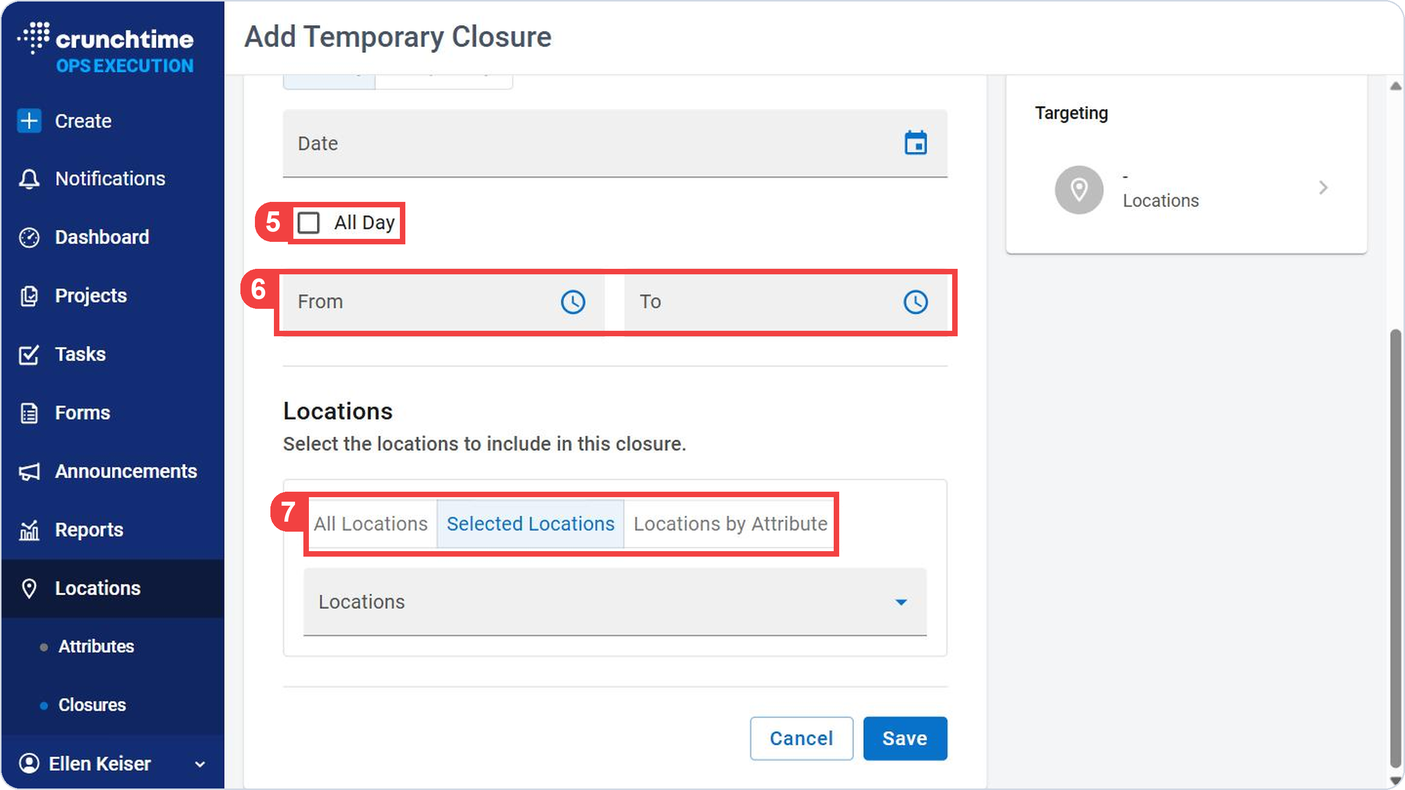
For One Day, select the date and then select All Day or for a partial day, select a date and then select a time From and To.
6
For a date range, enter a date From and a date To.
• Multiple Days closures are always full days, with no times.
7
In Locations, choose the All Locations, Selected Locations or Locations by Attribute tab.
• Selected Locations is selected by default when the form opens.
5
For One Day, select the date and then select All Day or for a partial day, select a date and then select a time From and To.
6
For a date range, enter a date From and a date To.
Multiple Days closures are always full days, with no times.
7
In Locations, choose the All Locations, Selected Locations or Locations by Attribute tab.
Selected Locations is selected by default when the form opens.
Note
Times are each location’s local time based on the time zone in the location’s settings.
Preview and Save
Check Your Closure, Then Save
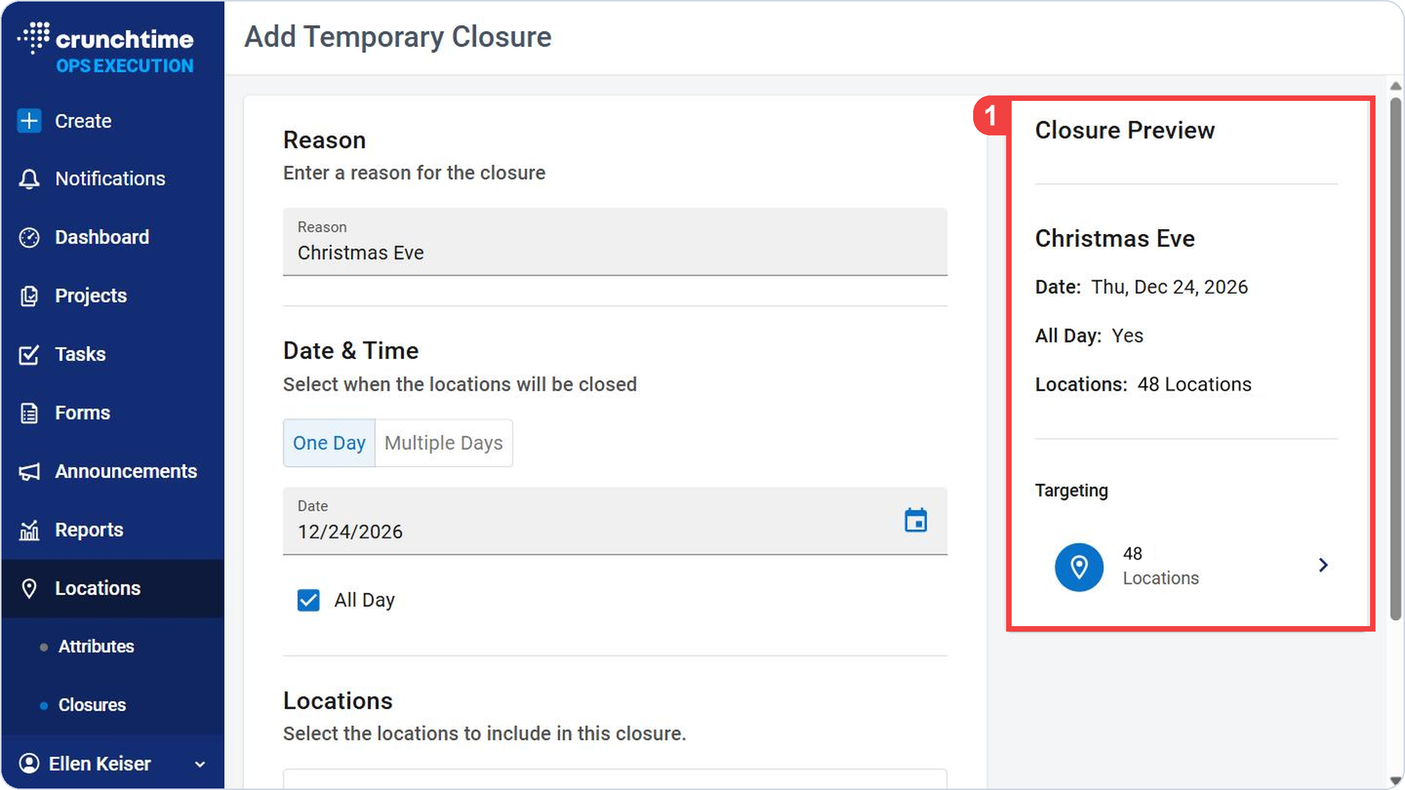
The Closure Preview updates as you fill in the form, so you can check it before you save.
Ops Execution > Locations > Closures
1
In Closure Preview, check that the reason, Date, All Day, Time, Locations and Targeting are what you want.
Before You Save: What a Closure Deletes and Keeps
Deletes
Keeps
Incomplete tasks for a location that start and are due inside the closed dates
Tasks you completed, before or during the closed dates
Tasks that start before, or end after, the closed dates
Tasks with no start or due time, or no location
Checklists: closures impact tasks only
1
In Closure Preview, check that the reason, Date, All Day, Time, Locations and Targeting are what you want.
2
Select Save in the Closure Preview, after you have checked what a closure deletes and keeps in the table above.
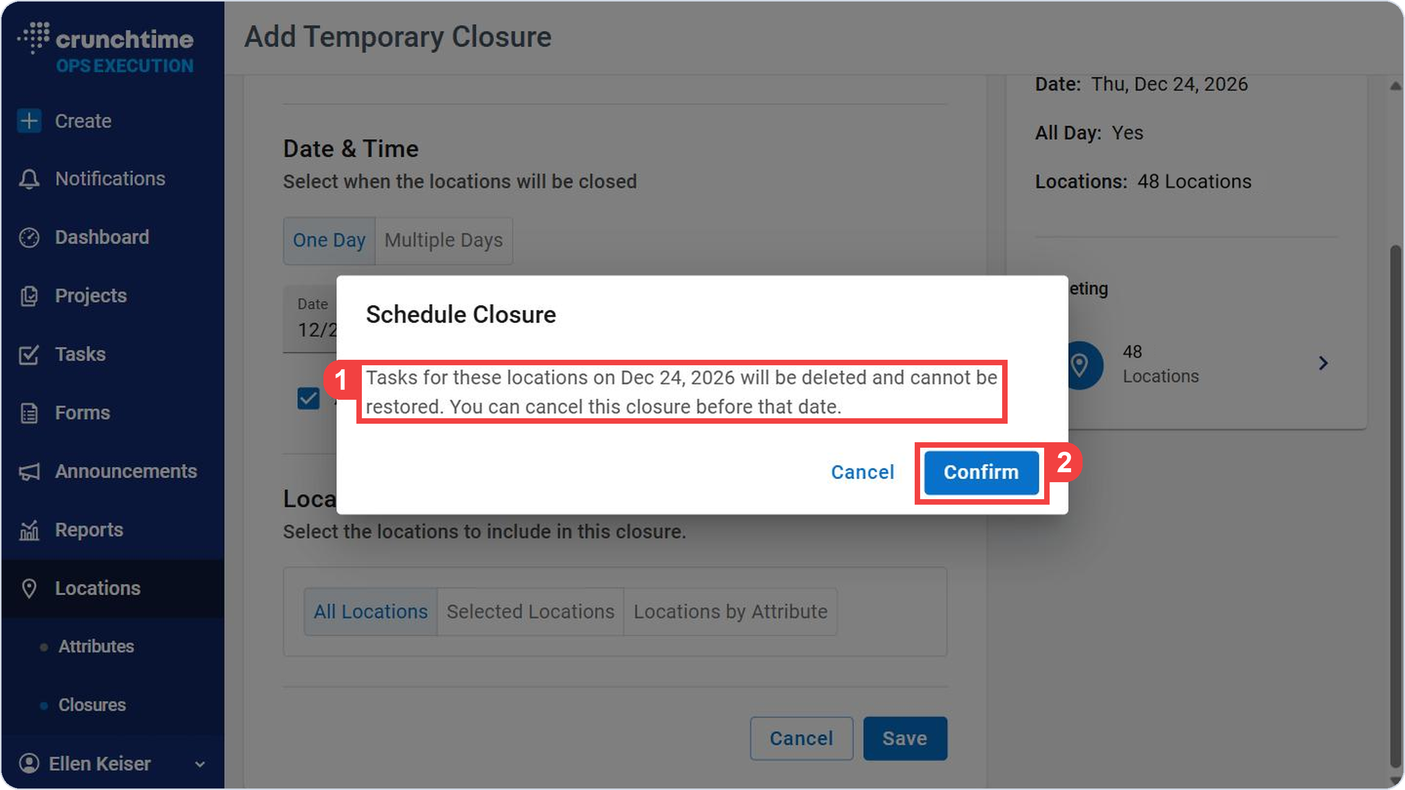
The Schedule Closure message opens.
Read the Schedule Closure Message
Confirm the Closure
Before the closure is saved, Ops Execution reminds you what it will do. Read it before you select Confirm.
Ops Execution > Locations > Closures
1
Check the Schedule Closure message: “Tasks for these locations on <date> will be deleted and cannot be restored. You can cancel this closure before that date.”
• To leave the dialog without saving, select its Cancel button instead of Confirm.
2
Select Confirm to save the closure.
• The closure is saved with the status Scheduled. No tasks are deleted yet.
1
Check the Schedule Closure message: “Tasks for these locations on <date> will be deleted and cannot be restored. You can cancel this closure before that date.”
To leave the dialog without saving, select its Cancel button instead of Confirm.
2
Select Confirm to save the closure.
The closure is saved with the status Scheduled. No tasks are deleted yet.
Alert
Tasks that a closure deletes cannot be restored. If a closure was a mistake, you can cancel this closure before that date. When the tasks are deleted, they will show as deleted by the person who created the closure.
View Closure Details
Open a Closure
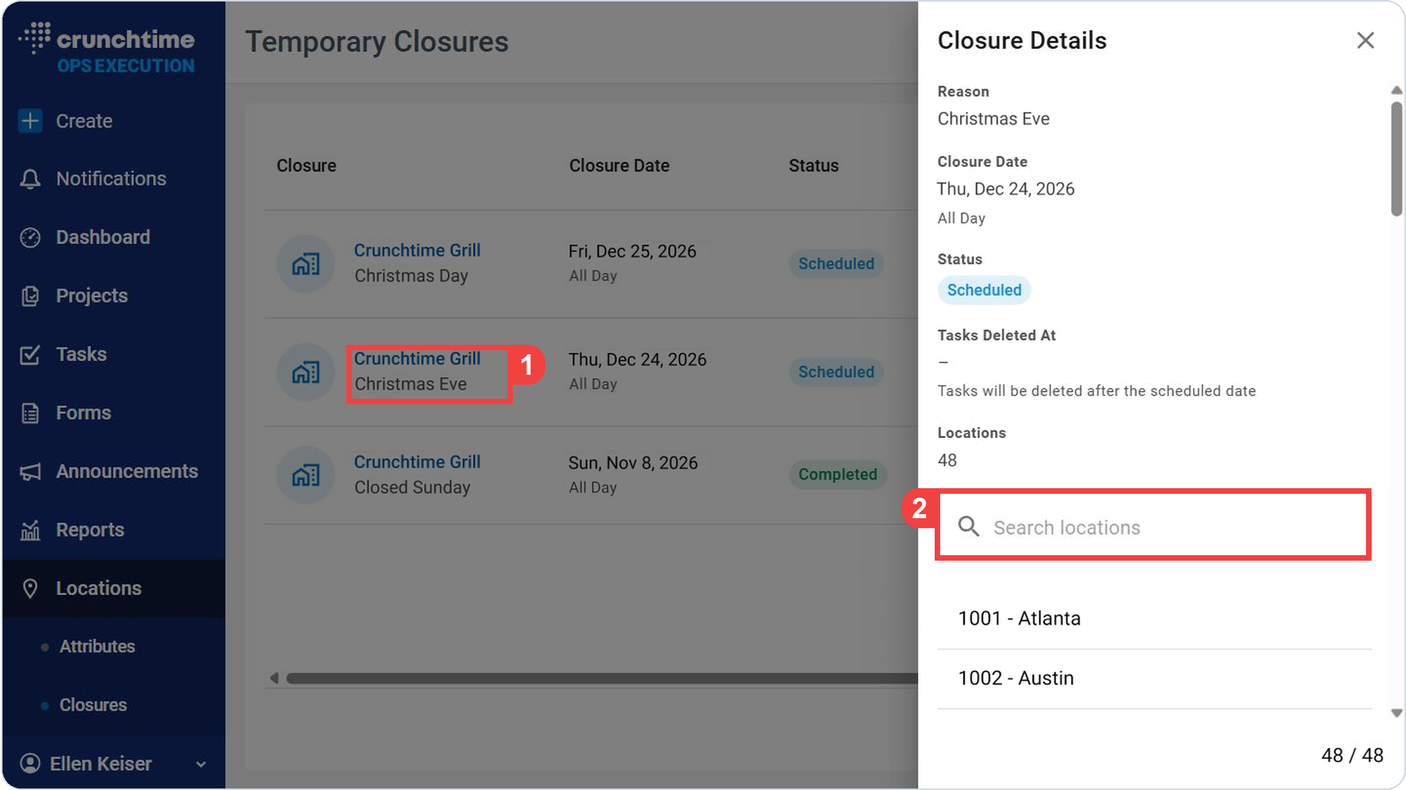
Open a closure to see what it impacts.
Ops Execution > Locations > Closures
1
In the Closure column of the Temporary Closures list, select the reason for the closure.
• The Closure Details side panel opens.
• It shows Reason, Closure Date, Status and Tasks Deleted At.
• It shows the number of Locations the closure impacts, a Search locations box and the list of those locations.
2
To find one location, type in the Search locations box.
1
In the Closure column of the Temporary Closures list, select the reason for the closure.
The Closure Details side panel opens.
It shows Reason, Closure Date, Status and Tasks Deleted At.
It shows the number of Locations the closure impacts, a Search locations box and the list of those locations.
2
To find one location, type in the Search locations box.
Cancel a Scheduled Closure
Cancel a Closure You No Longer Need
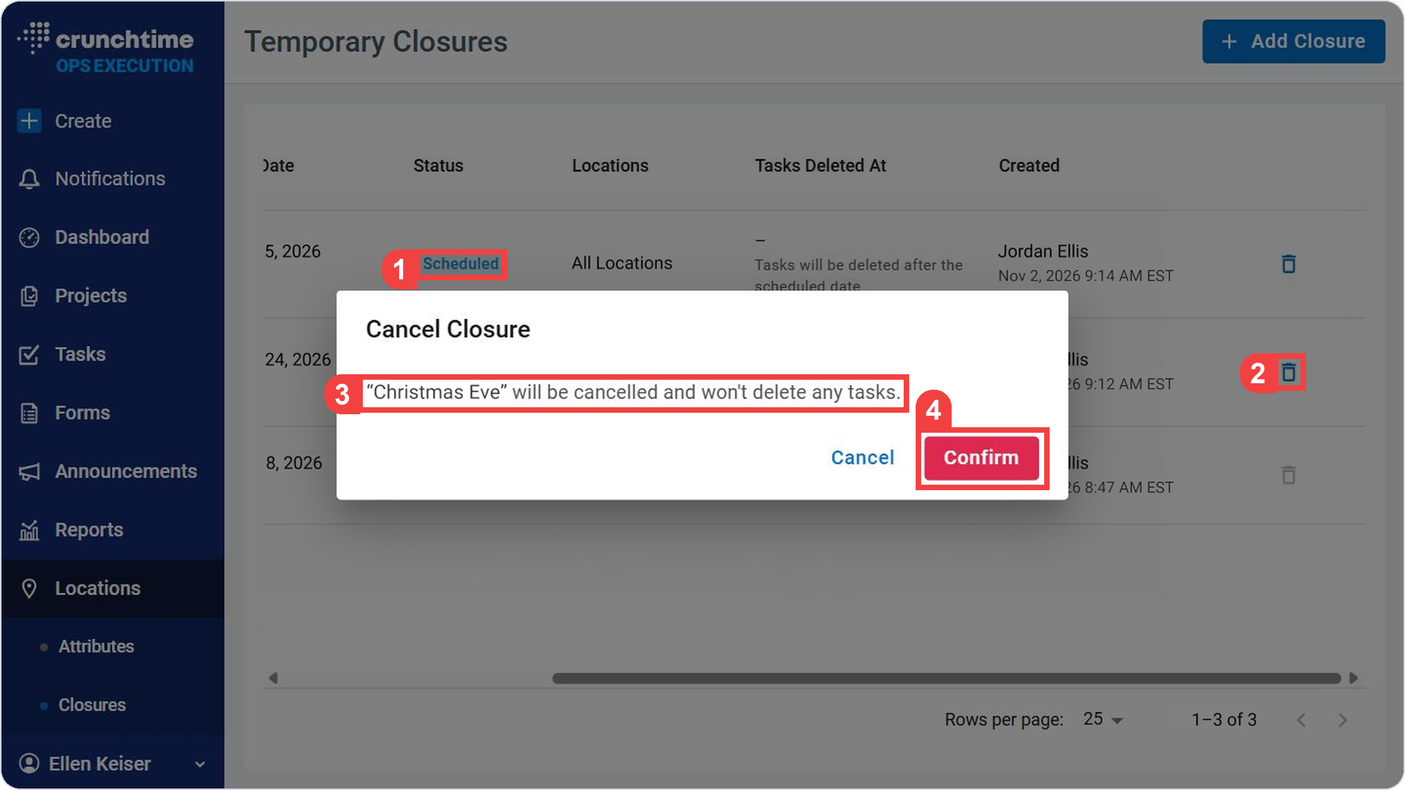
If you no longer need a closure, cancel it. Cancelling deletes no tasks.
Ops Execution > Locations > Closures
1
In the Temporary Closures list, look for the closure with the status Scheduled.
2
Select the trash icon on that row to remove the closure.
3
Check the Cancel Closure message: “<reason> will be canceled and won’t delete any tasks.”
• To leave the closure as it is, select Cancel in the dialog instead of Confirm.
4
Select Confirm to cancel and remove the closure.
1
In the Temporary Closures list, look for the closure with the status Scheduled.
2
Select the trash icon on that row to remove the closure.
3
Check the Cancel Closure message: “<reason> will be canceled and won’t delete any tasks.”
To leave the closure as it is, select Cancel in the dialog instead of Confirm.
4
Select Confirm to cancel and remove the closure.
Alert
You cannot cancel a closure once it is In Progress. The trash icon is greyed out on those rows.
Note
There is no edit option for a closure. To change one, cancel it and add a new closure.